

Zigbee2MQTT is one of those homelab tools that changes the shape of a smart home.
Instead of sending every bulb, plug, motion sensor, and switch through a vendor bridge, you run one local Zigbee coordinator, publish device state through MQTT, and let Home Assistant, Node-RED, ioBroker, Domoticz, or your own automations consume the messages.
Zigbee2MQTT lets you use Zigbee devices without the vendor bridge by translating Zigbee traffic into MQTT topics.
Zigbee2MQTT GitHub Source Code Zigbee2MQTT Documentation License: GPL-3.0 ❤️
What is Zigbee2MQTT?
Zigbee2MQTT is a bridge between a Zigbee network and an MQTT broker.
The hardware side is your Zigbee coordinator: usually a USB dongle or network-attached coordinator.
The software side is Zigbee2MQTT: it talks to the coordinator, understands devices through zigbee-herdsman and zigbee-herdsman-converters, stores local state, and publishes device data into MQTT.
That makes MQTT the integration layer.
Your automations do not need to know each vendor’s bridge API.
They subscribe to topics and send commands through topics.
Repository Snapshot
I cloned the repository into:
tmp/zigbee2mqtt
Source state:
| Item | Value |
|---|---|
| Repository | Koenkk/zigbee2mqtt |
| Commit | fcbb7ff44bdc05a16e95d3472a81d110646cc17b |
| Commit date | 2026-08-01T05:50:18Z |
| Commit message | chore(dev): release 2.13.0 (#32446) |
| Version | 2.13.0 |
| Package manager | [email protected] |
| Node engines | ^20.15.0 || ^22.2.0 || ^24 |
| License | GPL-3.0 |
Tech Overview of Zigbee2MQTT
Zigbee2MQTT is a TypeScript application compiled to dist/ and launched by index.js.
The runtime flow is:
Zigbee coordinator
  -> zigbee-herdsman
  -> Zigbee2MQTT controller
  -> extensions and state cache
  -> MQTT broker
  -> smart-home integrations
Important repo areas:
| Path | Purpose |
|---|---|
lib/controller.ts |
Application lifecycle and extension startup |
lib/zigbee.ts |
Coordinator, network, device, and group handling |
lib/mqtt.ts |
MQTT connection, subscriptions, retained messages, publishing |
lib/state.ts |
Device and group state cache |
lib/extension/ |
Bridge, publish/receive, frontend, groups, OTA, health, availability, Home Assistant |
lib/util/settings.ts |
Config loading, defaults, validation, migrations |
data/configuration.example.yaml |
Example user config |
docker/Dockerfile |
Official container image build |
The project depends on:
zigbee-herdsmanfor coordinator/network communicationzigbee-herdsman-convertersfor device model mappingsmqttfor broker connectivityajvfor settings validationjs-yamlfor configuration fileszigbee2mqtt-frontendandzigbee2mqtt-windfrontfor web UI packages
Self-Hosting Zigbee2MQTT with Docker
For most homelabs, Docker is the clean path.
You need three things:
- a Zigbee coordinator
- an MQTT broker
- a writable Zigbee2MQTT data directory
Pre-Requisites - Docker
Install Docker on your system before proceeding:
- Linux: Official Docker Engine install guide
- Windows / Mac: Docker Desktop
Verify installation: docker --version && docker compose version
Docker Compose Configuration
I added a Home-Lab Compose stack here:
Zigbee2MQTT Home-Lab Docker configIt includes Zigbee2MQTT plus Mosquitto:
services:
  mosquitto:
    image: eclipse-mosquitto:2
    container_name: zigbee2mqtt-mosquitto
    restart: unless-stopped
    volumes:
      - ./mosquitto.conf:/mosquitto/config/mosquitto.conf:ro
      - ./mosquitto-data:/mosquitto/data
      - ./mosquitto-log:/mosquitto/log
    ports:
      - "${MQTT_PORT:-1883}:1883"

  zigbee2mqtt:
    image: ghcr.io/koenkk/zigbee2mqtt:${ZIGBEE2MQTT_TAG:-latest}
    container_name: zigbee2mqtt
    restart: unless-stopped
    depends_on:
      - mosquitto
    volumes:
      - ./data:/app/data
      - /run/udev:/run/udev:ro
    devices:
      - ${ZIGBEE_ADAPTER:?Set ZIGBEE_ADAPTER in .env to your /dev/serial/by-id/... path}:/dev/ttyACM0
    ports:
      - "${ZIGBEE2MQTT_FRONTEND_PORT:-8080}:8080"
    environment:
      TZ: ${TZ:-Etc/UTC}
      ZIGBEE2MQTT_CONFIG_MQTT_SERVER: mqtt://mosquitto:1883
      ZIGBEE2MQTT_CONFIG_FRONTEND_ENABLED: "true"
      ZIGBEE2MQTT_CONFIG_SERIAL_PORT: /dev/ttyACM0
The important line is the required adapter mapping:
devices:
  - ${ZIGBEE_ADAPTER:?Set ZIGBEE_ADAPTER in .env to your /dev/serial/by-id/... path}:/dev/ttyACM0
Use the stable by-id path from:
ls -l /dev/serial/by-id
Do not casually use /dev/ttyACM0 or /dev/ttyUSB0 as the host path. Those can change after reboot or after plugging in another USB device.
Minimal Configuration
Copy the example configuration into the runtime data directory:
mkdir -p data
cp configuration.example.yaml data/configuration.yaml
The generated example uses the included Mosquitto service:
mqtt:
  base_topic: zigbee2mqtt
  server: mqtt://mosquitto:1883

serial:
  port: /dev/ttyACM0

frontend:
  enabled: true
If Zigbee2MQTT cannot auto-detect your adapter type, add it explicitly:
serial:
  port: /dev/ttyACM0
  adapter: zstack
Common adapter values include zstack, ember, deconz, zigate, and zboss.
For the SONOFF Zigbee 3.0 USB Dongle Plus V2 I tested later in this post, the working adapter value was:
serial:
  port: /dev/ttyACM0
  adapter: ember
That does not mean every SONOFF dongle uses ember. SONOFF has sold different coordinator families; pick the adapter type that matches your exact hardware and firmware.
Starting the Stack
Create your .env:
cp .env.sample .env
Set:
ZIGBEE_ADAPTER=/dev/serial/by-id/your-real-coordinator
For a lab experiment, ZIGBEE2MQTT_TAG=latest is convenient. For a long-running home setup, pin a known-good Zigbee2MQTT version after the coordinator and devices are working.
Then start:
docker compose up -d
Open the frontend:
http://localhost:8080
Field Note: What I Validated Locally
The first draft of this post only validated the repository and Docker Compose configuration. After getting a real coordinator, I came back and ran the stack with actual hardware. The detailed learning log below covers that live pass.
The live test used:
| Item | Value |
|---|---|
| Coordinator | SONOFF Zigbee 3.0 USB Dongle Plus V2 |
| USB serial bridge | Silicon Labs CP210x |
| Stable host path | /dev/serial/by-id/usb-Itead_Sonoff_Zigbee_3.0_USB_Dongle_Plus_V2_...-if00-port0 |
| Container path | /dev/ttyACM0 |
| Zigbee2MQTT adapter | ember |
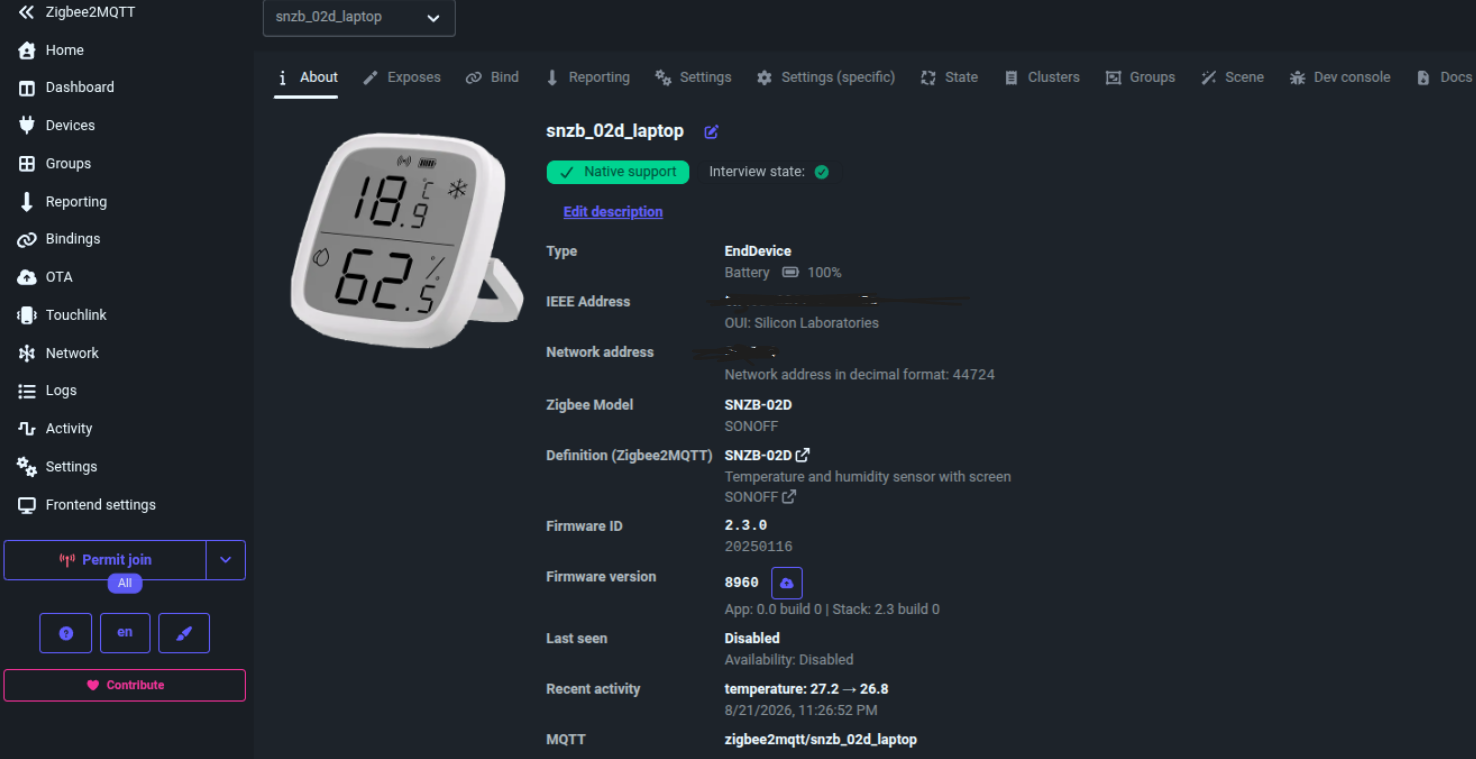
| Test device | SONOFF SNZB-02D temperature/humidity LCD sensor |
| MQTT topic after rename | zigbee2mqtt/snzb_02d_laptop |
Home-Lab compose validation still matters before starting:
ZIGBEE_ADAPTER=/dev/serial/by-id/replace-with-your-zigbee-coordinator docker compose config
Site snippet validation:
ZIGBEE_ADAPTER=/dev/serial/by-id/replace-with-your-zigbee-coordinator docker compose -f assets/snippets/zigbee2mqtt/docker-compose.yml config
Both rendered successfully.
The later live run confirmed the full path: USB detection, coordinator startup, new network creation, sensor pairing, MQTT messages, device rename, and permit-join cleanup.
Home Assistant and Other Integrations
Home Assistant is the common pairing, but it is not the only one.
Zigbee2MQTT speaks MQTT, so anything that can consume MQTT can integrate with it.
For Home Assistant discovery, enable:
homeassistant:
  enabled: true
For a dedicated Home Assistant stack, I prefer keeping Mosquitto, Zigbee2MQTT, and Home Assistant as separate services.
That makes upgrades and troubleshooting cleaner: MQTT broker health, coordinator access, and Home Assistant automation issues can be isolated.
Practical Setup Notes
Use a USB extension cable for the coordinator. Keep it away from the server chassis, SSDs, USB 3 noise, and WiFi access points.
Pick your Zigbee channel deliberately. Zigbee uses 2.4 GHz, so WiFi channel planning matters.
Back up the data/ directory. It contains configuration.yaml, database.db, coordinator backup files, generated network keys, device names, groups, and runtime state.
Keep permit_join off except while pairing devices. Leaving a Zigbee network open is avoidable risk.
Building From Source
For development:
git clone https://github.com/Koenkk/zigbee2mqtt.git
cd zigbee2mqtt
pnpm install --include=dev
pnpm run build
pnpm run start
Useful checks:
pnpm run check:w
pnpm run test:coverage
Conclusion
Zigbee2MQTT is the clean local-first way to make Zigbee devices speak MQTT.
It works well when you want control over your coordinator, broker, naming, discovery, automations, and backups instead of handing those concerns to a vendor bridge.
The deployment is straightforward, but it is hardware-sensitive.
The difference between a stable setup and a frustrating one is usually the coordinator path, adapter type, radio placement, MQTT reachability, permit-join hygiene, and Zigbee/WiFi channel planning.
My Learnings with Z2M and a SONOFF Dongle
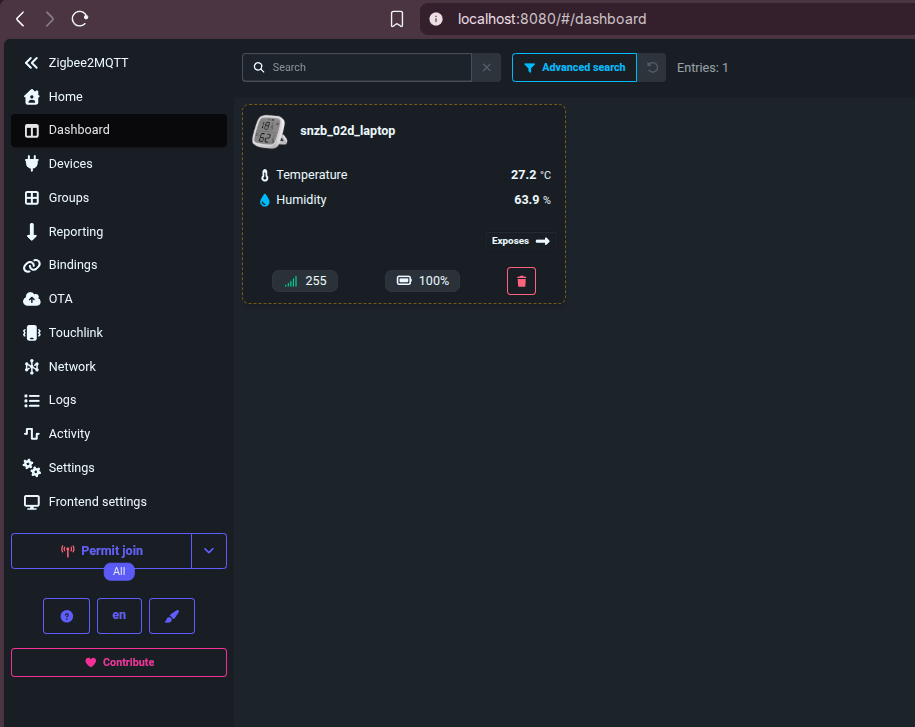
I got one of these:
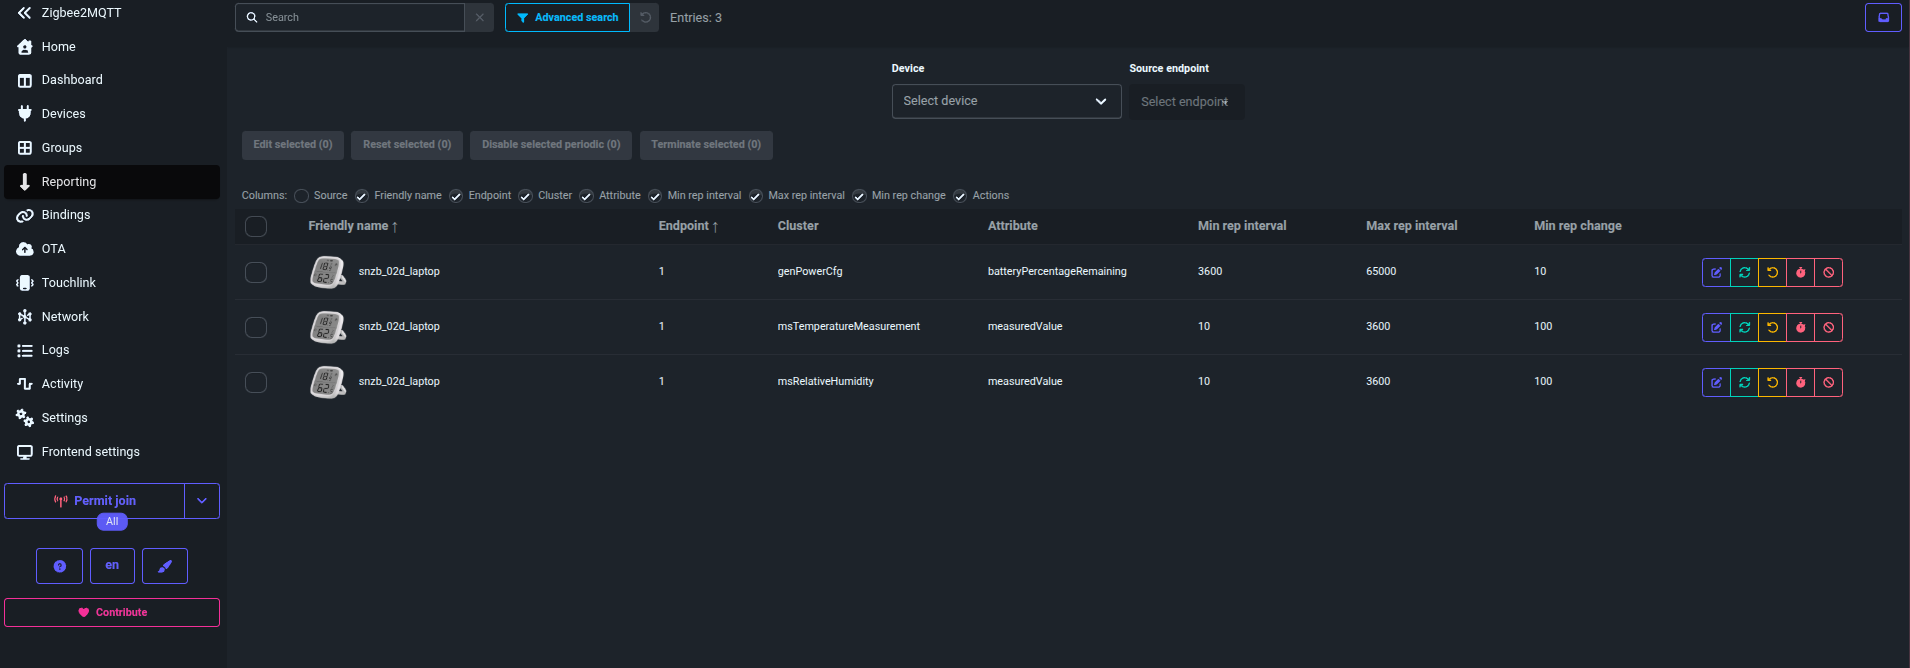
You can configure how frequently you get updates:
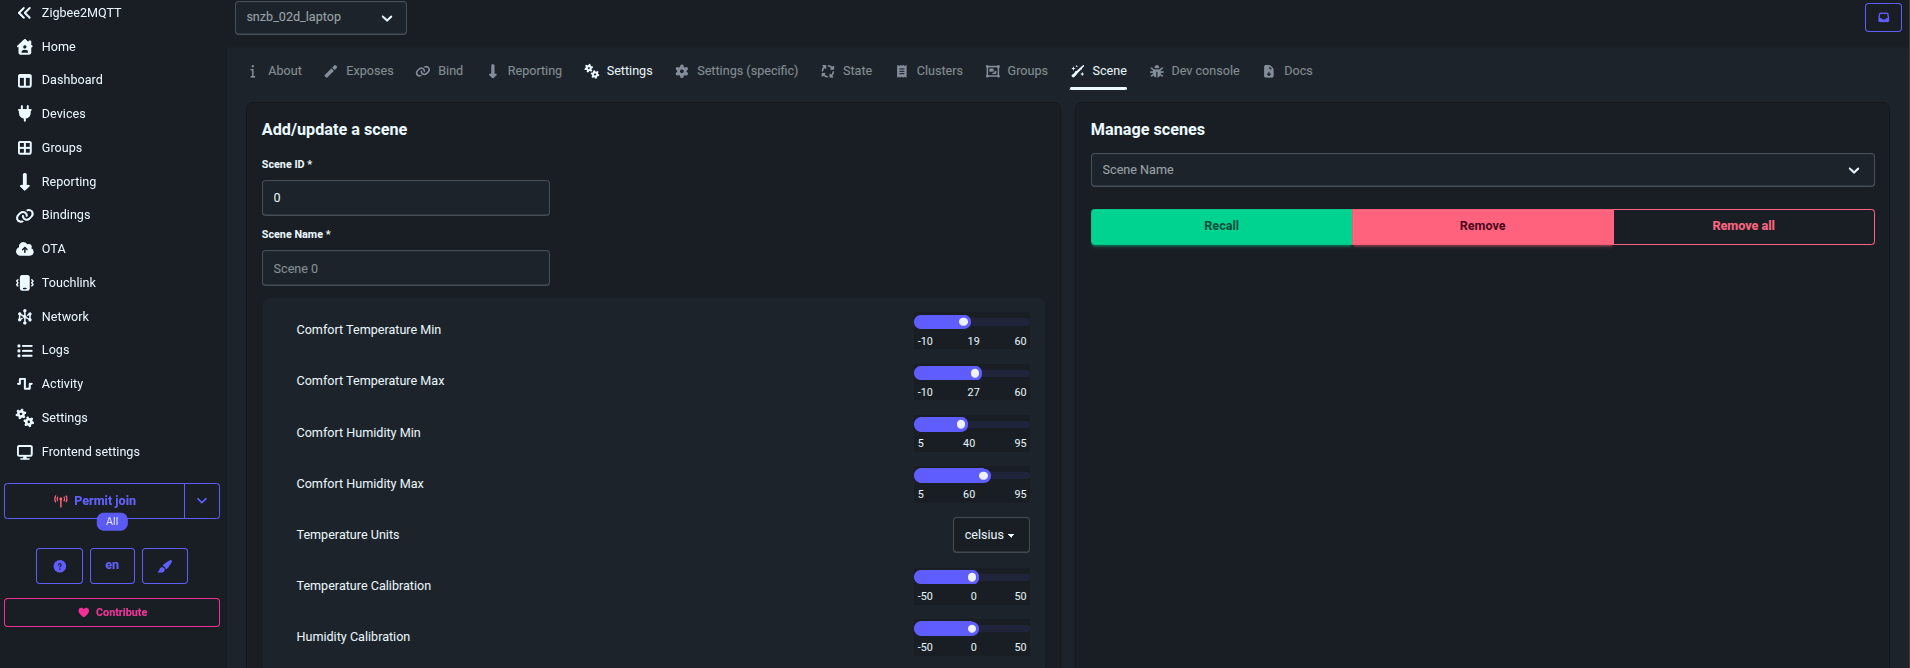
And the thresholds or offsets:
SONOFF Zigbee Dongle Learning Log
Date: 2026-08-21
What We Set Up
We successfully connected a SONOFF Zigbee USB dongle to this laptop, started a local Zigbee2MQTT stack, paired a SONOFF SNZB-02D temperature/humidity LCD sensor, and confirmed live readings over MQTT.
Final working state:
Zigbee2MQTT frontend: http://localhost:8080
MQTT broker:          localhost:1883
Sensor MQTT topic:    zigbee2mqtt/snzb_02d_laptop
1. Detected The USB Dongle
The dongle appeared as a USB serial device:
USB device: 10c4:ea60 Silicon Labs CP210x UART Bridge
Vendor:     Itead
Product:    Sonoff Zigbee 3.0 USB Dongle Plus V2
Serial:     <adapter-serial>
Driver:     cp210x
TTY:        /dev/ttyUSB0
Useful detection commands:
lsusb
ls -l /dev/ttyUSB* /dev/ttyACM* 2>/dev/null
find /dev/serial -maxdepth 3 -type l -ls 2>/dev/null
udevadm info --query=property --name=/dev/ttyUSB0
The stable path is:
/dev/serial/by-id/usb-Itead_Sonoff_Zigbee_3.0_USB_Dongle_Plus_V2_<adapter-serial>-if00-port0
Learning: use the /dev/serial/by-id/... path in configs, not /dev/ttyUSB0,
because ttyUSB0 can change when USB serial devices are plugged in different
orders.
2. Confirmed No Zigbee Network Was Running Yet
Initial checks showed:
- The dongle was present.
- Nothing was using
/dev/ttyUSB0. - Zigbee2MQTT, Home Assistant/ZHA, or another coordinator process was not running.
- No existing Zigbee2MQTT device database existed.
Useful commands:
fuser -v /dev/ttyUSB0
ps aux | rg -i 'zigbee|z2m|home.?assistant|zha|mqtt|mosquitto'
docker ps
ss -ltnp | rg ':1883|:8080'
Learning: seeing the USB dongle only proves the coordinator hardware is available. A Zigbee sensor will not appear until coordinator software is running and the device joins the Zigbee network.
3. Reused The Existing Zigbee2MQTT Docker Stack
There was already a local Docker Compose setup here:
~/Desktop/Home-Lab/zigbee2mqtt
Important files:
docker-compose.yml
mosquitto.conf
.env
data/configuration.yaml
We created .env:
TZ=Europe/Warsaw
ZIGBEE2MQTT_TAG=latest
ZIGBEE2MQTT_FRONTEND_PORT=8080
MQTT_PORT=1883
ZIGBEE_ADAPTER=/dev/serial/by-id/usb-Itead_Sonoff_Zigbee_3.0_USB_Dongle_Plus_V2_<adapter-serial>-if00-port0
We created data/configuration.yaml:
version: 5

mqtt:
  base_topic: zigbee2mqtt
  server: mqtt://mosquitto:1883

serial:
  port: /dev/ttyACM0
  adapter: ember

frontend:
  enabled: true

homeassistant:
  enabled: false

advanced:
  channel: 11
  network_key: GENERATE
  pan_id: GENERATE
  ext_pan_id: GENERATE
Learning: the host dongle path is mapped into the container as /dev/ttyACM0
by docker-compose.yml, so Zigbee2MQTT uses /dev/ttyACM0 even though Linux
shows the physical device as /dev/ttyUSB0.
4. Started Zigbee2MQTT
Started the stack:
cd ~/Desktop/Home-Lab/zigbee2mqtt
docker compose up -d
Checked logs:
docker compose logs -f zigbee2mqtt
Successful startup showed:
Ember Adapter Starting
ASH connected
EZSP started
Adapter version info: {"ezsp":13,"revision":"7.4.4 [GA]",...}
New network formed
Coordinator firmware version: ... "type":"EmberZNet"
Currently 0 devices are joined.
Connected to MQTT server
Started frontend on port 8080
Zigbee2MQTT started!
Learning: adapter: ember was correct for this detected V2 dongle. Zigbee2MQTT
formed a new Zigbee network and generated:
data/database.db
data/coordinator_backup.json
5. Opened The Zigbee Network For Pairing
We enabled permit-join for 180 seconds:
cd ~/Desktop/Home-Lab/zigbee2mqtt
docker compose exec -T mosquitto mosquitto_pub \
  -h localhost -p 1883 \
  -t zigbee2mqtt/bridge/request/permit_join \
  -m '{"time":180}'
The log confirmed:
Zigbee: allowing new devices to join.
Network opened.
Learning: Zigbee devices only join while permit-join is enabled.
6. Paired The SONOFF SNZB-02D
Physical action:
- Keep the SNZB-02D close to the dongle.
- Long-press the pairing button for about 5 seconds.
- Release when the signal icon starts blinking.
Zigbee2MQTT logs showed:
Device '<sensor_ieee>' joined
Starting interview of '<sensor_ieee>'
Successfully interviewed '<sensor_ieee>', device has successfully been paired
Device '<sensor_ieee>' is supported, identified as:
SONOFF Temperature and humidity sensor with screen (SNZB-02D)
Successfully configured '<sensor_ieee>'
Learning: the sensor was supported immediately and completed its interview cleanly.
7. Verified Live MQTT Readings
Before rename, readings arrived on:
zigbee2mqtt/<sensor_ieee>
Example readings during setup:
{
  "battery": 100,
  "humidity": 80.1,
  "linkquality": 255,
  "temperature": 28.6
}
Then:
{
  "battery": 100,
  "humidity": 69.7,
  "linkquality": 136,
  "temperature": 28.8,
  "temperature_units": "celsius"
}
Useful subscription command:
cd ~/Desktop/Home-Lab/zigbee2mqtt
docker compose exec -T mosquitto mosquitto_sub \
  -h localhost -p 1883 \
  -t 'zigbee2mqtt/#' -v
Learning: Zigbee2MQTT publishes retained-style device state messages as JSON on
MQTT topics under the zigbee2mqtt/ base topic.
8. Renamed The Device
We renamed the raw IEEE topic to a readable friendly name:
cd ~/Desktop/Home-Lab/zigbee2mqtt
docker compose exec -T mosquitto mosquitto_pub \
  -h localhost -p 1883 \
  -t zigbee2mqtt/bridge/request/device/rename \
  -m '{"from":"<sensor_ieee>","to":"snzb_02d_laptop"}'
Rename response:
{
  "data": {
    "from": "<sensor_ieee>",
    "homeassistant_rename": false,
    "to": "snzb_02d_laptop"
  },
  "status": "ok"
}
Final topic:
zigbee2mqtt/snzb_02d_laptop
Learning: friendly names make MQTT topics stable and human-readable.
9. Closed Permit-Join
The documented close form is:
cd ~/Desktop/Home-Lab/zigbee2mqtt
docker compose exec -T mosquitto mosquitto_pub \
  -h localhost -p 1883 \
  -t zigbee2mqtt/bridge/request/permit_join \
  -m '{"time":0}'
In this local run, a boolean payload also worked:
cd ~/Desktop/Home-Lab/zigbee2mqtt
docker compose exec -T mosquitto mosquitto_pub \
  -h localhost -p 1883 \
  -t zigbee2mqtt/bridge/request/permit_join \
  -m 'false'
Confirmed response:
{
  "data": {
    "time": null
  },
  "status": "ok"
}
Logs confirmed:
Zigbee: disabling joining new devices.
Network closed.
Learning: close the network after pairing so random nearby Zigbee devices cannot join.
10. Current Useful Commands
Show stack status:
cd ~/Desktop/Home-Lab/zigbee2mqtt
docker compose ps
Watch Zigbee2MQTT logs:
cd ~/Desktop/Home-Lab/zigbee2mqtt
docker compose logs -f zigbee2mqtt
Watch the sensor topic:
cd ~/Desktop/Home-Lab/zigbee2mqtt
docker compose exec -T mosquitto mosquitto_sub \
  -h localhost -p 1883 \
  -t 'zigbee2mqtt/snzb_02d_laptop' -v
Stop the stack:
cd ~/Desktop/Home-Lab/zigbee2mqtt
docker compose down
Start it again:
cd ~/Desktop/Home-Lab/zigbee2mqtt
docker compose up -d
Key Takeaways
- USB detection and Zigbee pairing are separate steps.
- The Sonoff dongle is a serial coordinator exposed through
cp210x. - Stable
/dev/serial/by-id/...paths are better than/dev/ttyUSB0. - This dongle worked with Zigbee2MQTT
adapter: ember. - Zigbee2MQTT created a new network and persisted it in
database.dbpluscoordinator_backup.json. - SNZB-02D pairing worked by long-pressing the button for about 5 seconds while permit-join was open.
- The final sensor topic is
zigbee2mqtt/snzb_02d_laptop.
FAQ
Do I need an MQTT broker for Zigbee2MQTT?
Can I run Zigbee2MQTT without a Zigbee coordinator?
Why use /dev/serial/by-id instead of /dev/ttyACM0?
ttyACM0 or ttyUSB0 path can change after reboot or when another USB serial device is connected.
Does Zigbee2MQTT replace Home Assistant?
How is Zigbee2MQTT different from ESPHome?
Zigbee2MQTT is for off-the-shelf Zigbee devices: sensors, plugs, bulbs, buttons, switches, and blinds that speak Zigbee through a coordinator.
ESPHome is for ESP8266 and ESP32 devices where you control the firmware yourself. It is better for custom relays, DIY sensors, Bluetooth proxies, displays, and one-off microcontroller projects.
They complement each other: Zigbee2MQTT handles the Zigbee mesh and publishes device state to MQTT, while ESPHome handles programmable Wi-Fi, Ethernet, and Bluetooth-capable microcontrollers.
Where is Zigbee2MQTT state stored in Docker?
/app/data. In the compose stack from this post, that maps to ./data.
What does IEEE mean?
In this Zigbee setup, IEEE means the device’s globally unique Zigbee hardware
address. It is also commonly called the IEEE address, EUI-64, extended address,
or long address.
For our SNZB-02D sensor:
IEEE: <sensor_ieee>
This address belongs to the physical sensor and is how Zigbee2MQTT first identifies it when it joins. Before we renamed the device, Zigbee2MQTT used the IEEE address as the MQTT topic:
zigbee2mqtt/<sensor_ieee>
After renaming, the same physical device has a friendlier MQTT topic:
zigbee2mqtt/snzb_02d_laptop
The IEEE address is still the stable underlying identity. The friendly name is just a human-readable alias.
What is the difference between Zigbee and Wi-Fi?
Wi-Fi devices connect directly to a Wi-Fi router or access point. They usually get an IP address and can talk over normal TCP/IP networking.
Zigbee devices do not join Wi-Fi and usually do not get IP addresses. They join a separate low-power Zigbee network managed by a coordinator, in our case the Sonoff USB dongle running through Zigbee2MQTT.
In this setup:
SNZB-02D sensor -> Zigbee radio -> Sonoff USB dongle -> Zigbee2MQTT -> MQTT
A Wi-Fi sensor would look more like:
Wi-Fi sensor -> Wi-Fi router -> MQTT / HTTP / app / cloud
Main differences:
| Area | Zigbee | Wi-Fi |
|---|---|---|
| Network | Separate Zigbee network | Existing Wi-Fi network |
| Coordinator | Required, for example the Sonoff dongle | Wi-Fi router/access point |
| IP address | Usually no IP per device | Usually each device gets an IP |
| Power use | Very low, good for battery sensors | Higher, harder on batteries |
| Range | Mesh-capable with powered Zigbee routers | Depends on Wi-Fi coverage |
| Band | Usually 2.4 GHz | 2.4 GHz, 5 GHz, 6 GHz depending on hardware |
| Local integration | Commonly via Zigbee2MQTT or ZHA | Depends on device protocol |
For the SNZB-02D, Zigbee is a good fit because the sensor is battery-powered and only needs to send small temperature/humidity updates. It does not need the power cost or complexity of full Wi-Fi.
What is LQI / link quality? Is it RSSI?
In the Zigbee2MQTT UI this is shown as linkquality. It means LQI: Link
Quality Indicator.
It is related to radio quality, but it is not the same as RSSI.
RSSI = raw received signal strength, usually shown in dBm, for example -40 dBm
LQI  = Zigbee packet/link quality score, commonly shown from 0 to 255
In Zigbee2MQTT, higher linkquality is better:
200-255  excellent
100-200  usable/good
50-100   weak but may work
0-50     poor/unreliable
For our SNZB-02D sensor, observed values included:
136
184
255
So the sensor link is working. The value can jump around because battery Zigbee sensors sleep, wake briefly to report, and are affected by antenna orientation, nearby metal, laptop USB noise, distance, and whether the sensor is being held.
What do the SNZB-02D MQTT message fields mean?
Example message from our sensor:
{
  "battery": 100,
  "comfort_humidity_max": 60,
  "comfort_humidity_min": 40,
  "comfort_temperature_max": 27,
  "comfort_temperature_min": 19,
  "humidity": 63.9,
  "humidity_calibration": 0,
  "linkquality": 255,
  "temperature": 27.2,
  "temperature_calibration": 0,
  "temperature_units": "celsius",
  "update": {
    "installed_version": 8960,
    "latest_release_notes": null,
    "latest_source": "https://raw.githubusercontent.com/Koenkk/zigbee-OTA/master/images/Sonoff/snzb-02d_v2.3.0.ota",
    "latest_version": 8960,
    "state": "idle"
  }
}
Field meanings:
| Field | Meaning |
|---|---|
battery |
Battery level in percent. 100 means full. |
temperature |
Current measured temperature. Here: 27.2 Celsius. |
humidity |
Current measured relative humidity. Here: 63.9%. |
linkquality |
Zigbee LQI signal/link quality. 255 is excellent. |
temperature_units |
Unit used by the sensor display/config. Here: Celsius. |
temperature_calibration |
Offset applied to temperature. 0 means no correction. |
humidity_calibration |
Offset applied to humidity. 0 means no correction. |
comfort_temperature_min |
Below this value the device may show a cold warning. |
comfort_temperature_max |
Above this value the device may show a hot warning. |
comfort_humidity_min |
Below this value the device may show a dry warning. |
comfort_humidity_max |
Above this value the device may show a wet warning. |
update.state |
OTA update state. idle means no update is running. |
update.installed_version |
Firmware version currently on the device. |
update.latest_version |
Latest firmware version known to Zigbee2MQTT. |
For our observed messages:
temperature: 27.2-27.8 C
humidity:    63.3-65.6 %
linkquality: 252-255
battery:     100 %
That is a healthy sensor link. The room is above the default humidity comfort
maximum of 60%, so the device may classify the room as humid/wet. A
temperature around 27.2 C is also slightly above the default comfort maximum
of 27 C, so it may classify the room as hot depending on rounding and display
logic.
The OTA fields show:
installed_version: 8960
latest_version:    8960
state:             idle
So Zigbee2MQTT sees the installed firmware as already matching the latest known firmware, and no OTA update is currently running.
Comments